Electroscopes or 'gold-leaf' electroscopes as they are sometimes known are devices which measure electrical charge (static electricity). They usually consist of a metal box with glass windows and a charge plate on top. Inside the box is a rod with a small piece of gold leaf (Dutch metal is often used because it is much cheaper). When an electrostatically charged material (a polycarbonate rod for example) is brought near the top of an electroscope, the charge travels down the metal part (electrode) and charges the gold leaf. In the case of the two leaf electroscope, both leaves become equally charged and repel each other.
More information regarding electroscopes can be found in our Equipment section.
This guide shows how to make a simple electroscope which works in the same way as commercial devices. Instead of a charge plate, aluminium foil is used but all the other parts are similar to those found in more expensive models and can be used in the classroom just as effectively.
Firstly you will need to find a glass or plastic jar to use as the case of the device. Smaller jars work better and glass jars will work better than plastic ones although all types will work to some extent. The lid needs to be removable.

Fig 1 shows the jar and steel rod. The rod should be bent at a right angle near the bottom, leaving approximately 3-4cm for the gold leaf to rest upon. A hole should be drilled into the lid of the jar nearer one side. This will enable the gold leaf to be central to the jar. It is important that the gold leaf does not touch the sides of the jar so use the bent rod as a drilling guide. The hole should be the same diameter as the rod or slightly smaller.
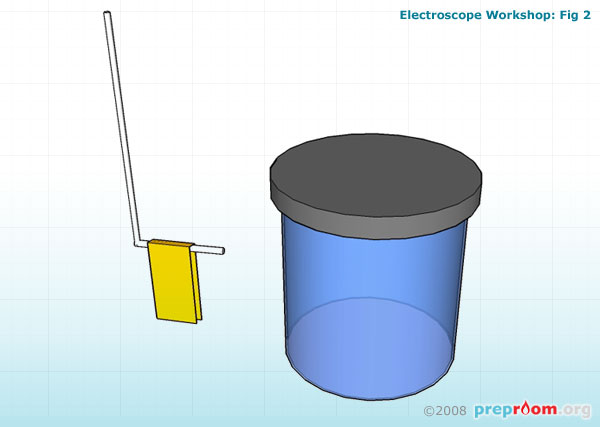
Fig 2 shows how the gold leaf is folded over the bent part of the rod. A strip of leaf should be cut that is approximately 6cm long and 1cm wide. This should gently folded in half and rested over the bent part of the bar leaving 3cm of leaf over each side.
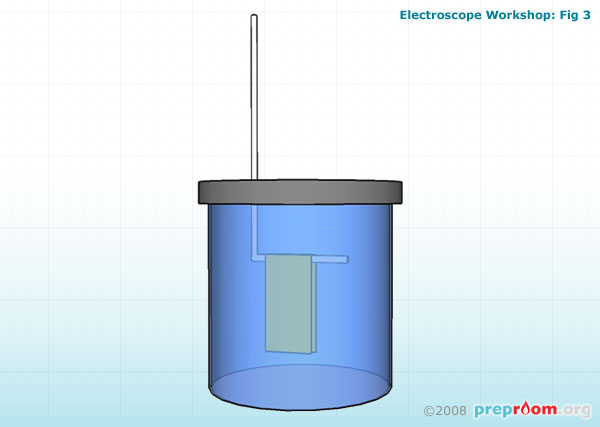
The rod and leaf should be inserted into the jar as in fig 3. Glue the rod in place if you need to. Ensure the gold leaf or rod is not touching the inside of the jar at any point.
Cut a piece of aluminium foil and roll it into a ball. This will act at the charge plate. Make sure the ball is scrunched as tightly as possible and secure to the top of the rod. The ball should be only a few centimetres from the top of the jar so you may need to trim the rod accordingly.
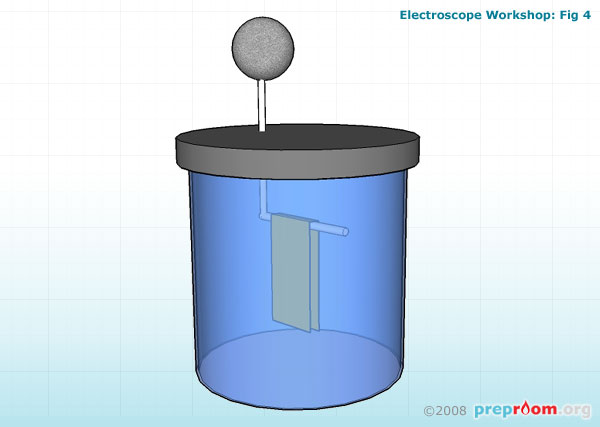
The electroscope should now be ready to test (see fig 4).
Charge a balloon by rubbing it on your hair or a duster until it is charged. Bring the balloon near the aluminium ball and the two parts of the gold leaf should separate slightly.
The effectiveness of electroscopes can depend on atmospheric conditions and so on damp days the leaf may not separate as easily.
Electroscopes can be purchased from suppliers for around £30-£50. This working model should cost you approximately 50p assuming you have a spare glass jar. Dutch metal can be purchased in books of 50-100 leaves, enough to make thousands of electroscopes! Steel rods can be purchased cheaply from most suppliers or scrounged from your technology department for free.
On a class set of 15 electroscopes, by using this guide you could save yourself £600.