| Difficulty Level: |
 |
very simple |
Parts and Tools
- Plywood
- Timber batten
- PVA / wood glue
- Panel pins
- 'G' clamps
|
- White acrylic paint
- Paintbrush
- Tenon saw
- Sandpaper (fine)
|
Instructions
Optics screens are used in physics lessons to display projected images such as spectra or beams from rayboxes. They usually are of a very simple wooden construction made from two sheets. One acts as the screen and the other is joined to it at 90° and acts as the stand, enabling it to stand stable on a desktop without falling over.
The optics screen can be constructed in one of two ways, either joining the two pieces in a 'T' or 'L' formation. This guide shows how to make the 'L' shaped screen as these are stackable and therefore take up less room when in storage. A class set of these can be stored in a single tray.
As with some of our guides, the construction measurements are approximate and you may want to vary the dimensions or construction materials to suit your intended application.
The wood used to construct this screen consists of two types; 3-5mm ply for the screen part and 10-12mm timber cut into rectangles. The pieces should be sawn accurately using a sharp tenon saw and then each piece sanded to remove sharp or splintered edges. The screen part made from ply should be 200 x 300mm and the timber should be cut into pieces which are 150 x 200mm.
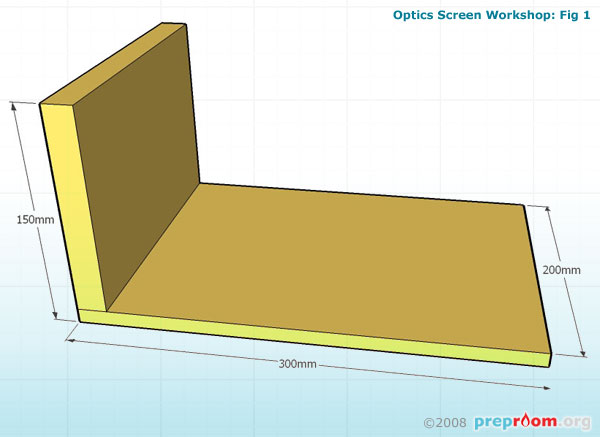
Fig 1: Join parts together with PVA glue
Fig 1 shows the two parts joined with PVA glue and then pinned in a few places with panel pins. Each piece should be generously painted with PVA where the two meet and 4 panel pins should be hammered in, which will hold the two parts securely. The parts should be held firmly in a 'G' clamp for 24 hours to enable the glue to fully set. Once set you should find the screen more than robust enough to use in the classroom.

Fig 2: Paint front of screen white, with acrylic paint
Finally the front area of the screen needs to be painted in white acrylic paint to give a neutral colour for the projected images to be best seen (see fig 2).
This needs time to dry before the units can be stacked together. Alternatively, and for a smoother surface, glue a sheet of thin white card to the screen surface, wait until the glue has dried and then cut around the edges with a scalpel.
Optics screens can be made to any dimensions to suit your requirements but these screens are perfect to be used alongside rayboxes and lasers and are cheap and easy enough to construct class sets of.
Disclaimer
Before attempting any of the construction projects featured on this website, ensure you have, and know how to use, the appropriate tools, components and safety equipment and are competent to undertake the project. These guides are for information only and we hold no responsibility for any accidents, injuries or damage caused by the use or misuse of any equipment, project or information contained within this website. In short - use common sense and stay safe!